✨ Introduction
Welcome to this adorable rabbit crochet pattern, designed with love for all skill levels. Whether you’re new to amigurumi or a seasoned crocheter, this pattern will guide you through each step to create a soft, cuddly bunny friend.
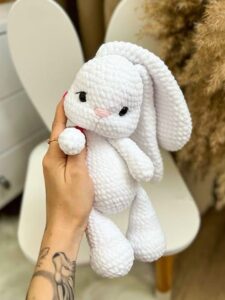
The finished rabbit measures approximately 24 cm tall (without ears) and is made using plush chenille yarn with a 3.25–4 mm crochet hook. Each part is worked separately and assembled with care. This handmade bunny isn’t just a cute toy—it’s a thoughtful, heartfelt gift that brings warmth and joy.
🧶 Materials Needed
- Yarn: LaVita Velur (super bulky chenille yarn, 100g/120m), Color No. 1002 – 2 skeins
(Optional: YarnArt Jeans No. 74 for embroidered details) - Hook Sizes: 3.25 mm (for the toy), 4.0 mm (for ears)
- 12 mm black safety eyes
- Plastic safety nose
- Polyester fiberfill stuffing
- Black embroidery floss (for eyebrows and nose)
- Tapestry needle & scissors
📘 Abbreviations (US Terminology)
- MR = Magic Ring
- ch = Chain
- sc = Single Crochet
- inc = Increase (2 sc in the same stitch)
- dec = Decrease (single crochet two together)
- sl st = Slip Stitch
- F.o. = Fasten Off
- ( ) = Total number of stitches in the round
- ( ) * x = Repeat the sequence in brackets x times
🧠 Head
R1: 6 sc in MR (6)
R2: (inc) * 6 (12)
R3: (1 sc, inc) * 6 (18)
R4: (2 sc, inc) * 6 (24)
R5: (3 sc, inc) * 6 (30)
R6: (4 sc, inc) * 6 (36)
R7: (5 sc, inc) * 6 (42)
R8–R11: 42 sc
R12: 9 sc, (inc) x3 – cheek, 18 sc, (inc) x3 – cheek, 9 sc (48)
R13–R17: 48 sc
R18: (6 sc, dec) * 6 (42)
R19: (5 sc, dec) * 6 (36)
R20: (4 sc, dec) * 6 (30)
(Insert safety eyes between R11 and R12, 7–8 sc apart)
R21: (3 sc, dec) * 6 (24)
R22: (2 sc, dec) * 6 (18), sl st.
Stuff firmly.
🧵 Facial Sculpting & Features
Use yarn and a needle to shape the cheeks and under-eye areas using points T1–T6.
- T1 and T4: on the muzzle between R21–R22
- T2, T3, T5, T6: under and beside the eyes (between R12–R13)
Tighten and knot securely. Hide ends inside the head. Embroider the eyebrows and nose.
👂 Ears (Make 2)
R1: 6 sc in MR (6)
R2: (inc) * 6 (12)
R3: (1 sc, inc) * 6 (18)
R4: (2 sc, inc) * 6 (24)
R5: (3 sc, inc) * 6 (30)
R6–R9: 30 sc
R10: (dec, 13 sc) * 2 (28)
R11: 28 sc
R12: (dec, 12 sc) * 2 (26)
R13: 26 sc
R14: (dec, 11 sc) * 2 (24)
R15: 24 sc
R16: (dec, 10 sc) * 2 (22)
R17: 22 sc
R18: (dec, 9 sc) * 2 (20)
R19: 20 sc
R20: (dec, 8 sc) * 2 (18)
R21: 18 sc
R22: (1 sc, dec) * 6 (12)
R23–R30: 12 sc
Fold in half and crochet through both sides (6 sc). Leave a long tail for sewing.
📌Thank you for reading the article.
🐾 Hind Legs (Make 2)
R1: 6 sc in MR (6)
R2: (inc) * 6 (12)
R3: (1 sc, inc) * 6 (18)
R4: (2 sc, inc) * 6 (24)
R5: (3 sc, inc) * 6 (30)
R6–R7: 30 sc
R8: 6 sc, (1 sc, dec) * 6, 6 sc (24)
R9: 6 sc, 6 dec, 6 sc (18)
R10–R13: 18 sc
R14: (1 sc, dec) * 6 (12) — Stuff here
R15–R18: 12 sc
Fold and sc through both sides (6 sc). Leave tail for sewing.
🐾 Forelegs (Make 2)
R1: 6 sc in MR (6)
R2: (inc) * 6 (12)
R3–R4: 12 sc — Light stuffing
R5: (2 sc, dec) * 3 (9)
R6–R15: 9 sc
Fold and crochet 4 sc through both sides. Leave tail for sewing.
🐇 Tail
R1: 6 sc in MR (6)
R2: (inc) * 6 (12)
R3: 12 sc
R4: (2 sc, dec) * 3 (9)
Stuff lightly. Leave a long tail and sew above the hind legs.
🧸 Body
R1: 6 sc in MR (6)
R2: (inc) * 6 (12)
R3: (1 sc, inc) * 6 (18)
R4: (2 sc, inc) * 6 (24)
R5: (3 sc, inc) * 6 (30)
R6: (4 sc, inc) * 6 (36)
R7: (5 sc, inc) * 6 (42)
R8: 8 sc, 6 sc together with hind leg, 14 sc, 6 sc with other hind leg, 8 sc (42)
R9–R12: 42 sc
R13: 12 sc, (1 sc, dec) * 6, 12 sc (36)
R14–R15: 36 sc
R16: (4 sc, dec) * 6 (30)
R17–R18: 30 sc
R19: (3 sc, dec) * 6 (24)
R20: 24 sc
R21: (2 sc, dec) * 6 (18)
R22: 4 sc, 4 sc together with foreleg, 4 sc, 4 sc with other foreleg, 2 sc (18)
R23: 18 sc, sl st.
Leave a long tail for sewing.
🔧 Final Assembly
- Sew ears to the head (between rounds 4 and 5)
- Attach the head to the body
- Attach the arms and legs (if not crocheted in)
- Sew the tail slightly above the legs
- Embroider facial features if desired
- Weave in all loose ends and secure
📌Thank you for reading the article.
📝 Notes
- This pattern is suitable for beginners and intermediates
- Feel free to customize colors or use different yarn types
- You may sell finished items with credit to the original designer
- This rewritten version is intended for educational sharing purposes only
🧶 Original design by zefirka.vlg
✨ Rewritten with care for the crafting community